Using Hudson Teams, Part 1 – The Basics
In this article I’ll be walking you through the basics of the new Hudson 3.1 feature “Team Concept”. As the name suggests, this feature takes Hudson from using a flat, granular, authorization model into one where users are assigned to one or more teams. The important thing here is that all of the jobs, owned by each team, are effectively sandboxed from each other and Hudson becomes a multi-tenant environment. This is great news for sites that want to host multiple development teams on a single Hudson instance but prevent them from viewing, editing, running or otherwise interfering with each others jobs. In the past you would have had to either stand up a Hudson instance per team, or define user permissions for each and every job using Job-based Matrix Authorization if you wanted to maintain such separation.
I’ll start off with a simple example of team use, just using Hudson’s own user database. In a following article I’ll show you how to use an LDAP server instead, which, as we’ll see will add an extra nifty feature to the mix.
If you want to follow along you’ll need Hudson 3.1.0 or above, intialized with the default set of plug-ins. In this case I’m starting from a completely empty, initialized Hudson instance with no security enabled. To help illustrate some features later on, I’ve created a single freestyle job called “Job1”, it does not matter what that job does, it’s the ability to see and run it that will become important later:

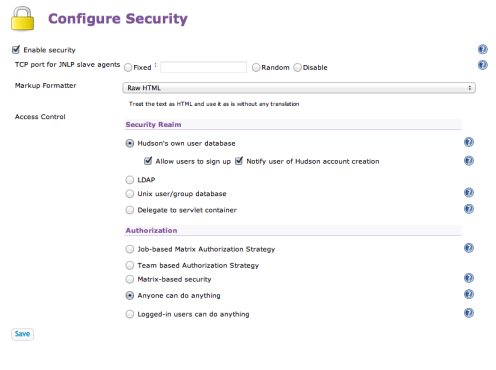
At this point, my Hudson instance is unsecured and wide open to anyone who can get to the URL. Lets’s fix that by going into the Manage Hudson option on the sidebar and choosing Configure Security from the list. This screen initially presents you with a simple choice:

So naturally enough I’ll choose to enable security using the checkbox. The screen will now expand and you’ll see the various security providers that you can plug in to secure Hudson. In the next article I’ll be using LDAP , but in this starter article I’ll just select Hudson’s own user database. With this security model, Hudson will manage the authorized users and, as you can see here, you can even allow users to self register. This mode is ideal for small development groups in a known and trusted environment and is sufficient to demonstrate the basics of Team Concept feature.
 Now that security is enabled I can create some sample users. To do this, I click on Manage Hudson again in the sidebar, having saved the security changes, and select Manage Users. I’ll go ahead and create a small set of users, Duncan, Winston, Bob, Geoff and Latha using the Create User link:

So now back to the Configure Security screen, you’ll see that by default, in the Authorization section, the option is set to the default Anyone can do anything. This option basically means that users don’t even have to log in to manage Hudson which is not what we want. Now I could of course just switch on one of the other traditional Hudson options here such as Job based security, but this is an article about Team concept so I’ll choose Team-based Authorization Strategy.
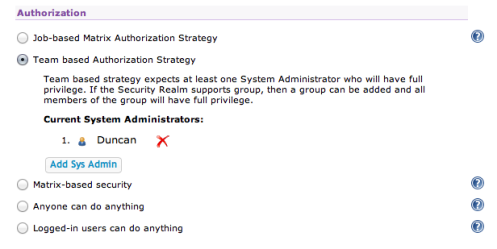
When using Teams the first thing you’ll need to do is to assign a user as System Administrator. This is a super-user who manages the teams as a whole and can see everything. Generally you’d have a specialist user for this role but for the sake of example, I’ll add myself:
Having saved that you’ll notice that the Hudson home screen has now changed, the New Job option and Manage Hudson option have disappeared from the sidebar. That’s because I’ve now got an authorization policy in place but of course I’m still not logged in.
At this point if I logged in as any user other than Duncan I’d still not see the New Job or Manage Hudson entries, Why? Well, so far I’ve only defined Duncan as the super-user and no-one else is assigned to a team yet, until they are assigned their privileges are restricted. Logging in as Duncan I can now see the expected sidebar options plus a new one Manage Teams.
Choosing Manage Teams I can go ahead and start to create some, in this case I’ll create two teams called Dev and QA respectively:

You’ll notice that apart from the obvious name and description you also have the ability to define a custom team folder. This is the location on the server in which the team’s jobs and builds will be stored. If you leave this blank then the team gets a folder under /teams in the HUDSON_HOME, e.g $HUDSON_HOME/teams/Dev. The purpose of this option is, again, to help sites sandbox teams and manage resources. You may choose to allocate different team folders to different storage volumes etc.
Once a team is created you can add members to it using the Add New Member button.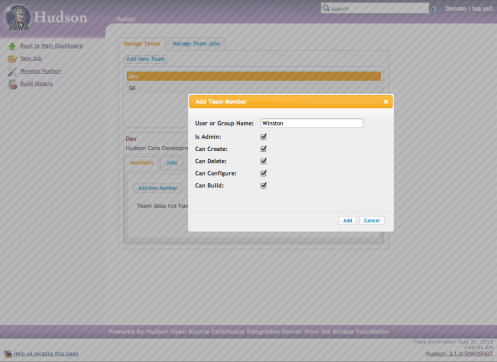
Here, I’ve added Winston as a Team Member. By checking the Is Admin option, Winston will now be able to manage this team from here on in. The other options are self explanatory.
Still logged in as Duncan, the super-user, I’ll assign Latha as a user and administrator for the QA team as well, save and then log out.
Great, so I now have two teams and an administrator for each. Now I’ll log in as Winston and start to manage the Dev team.
Logged in as Winston, I still can’t see the Manage Hudson option in the sidebar because Winston is not the super-user, however, I can see New Job and Manage Team. As Winston if I click New Job and create Job2 this will be the result:

As you can see here we have jobs called Job1 and Dev.Job2. Remember Job1? We created that before switching the Team support on. As such, Job1 is now treated as a PUBLIC job that anyone can view. Public jobs like this can only be managed and run by the super-user. I’ll explore in a later article how you might copy such a job into a team’s private job list.
The job “Job2”, that I created as Winston, appears in the list as Dev.Job2. This is because the job is owned by the Dev team and we use the team prefix to identify this. If I where to logout and login as say Latha, I’d still see the public job Job1 but not Dev.Job2 because she’s not in the Dev team. Team prefixes are important, once you’ve created jobs in teams URLs used for things like the REST API will all use this prefix as well as the job name.
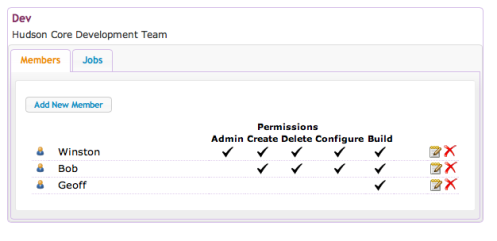
As Winston, I now go into Manage Teams and add some more members to my team with different privileges:
 I can also login as Latha and add a member to her team:
Notice how Geoff is in both teams with different access rights in each case. If I create another job as Latha in the QA team e.g QA.Job3,, Geoff will be able to see and run that, as well as being able to run (but not manage) the Dev.Job2. If a user is a member of more than one team and is able to create jobs in more than one of them then they can specify which team context to create it in. If they do not specify a team when creating the job then Hudson will default it to the first suitable team that they are a member of and have the correct privileges on.
So that’s the basics of team allocation, the last thing to look at in this introductory article is Job visibility.
So far we have seen that jobs are private to a team and invisible outside of the team, unless they have been created by the super-user. However, a team administrator is able to change this through the Manage Team > Jobs screen by choosing the Configure Visibility option: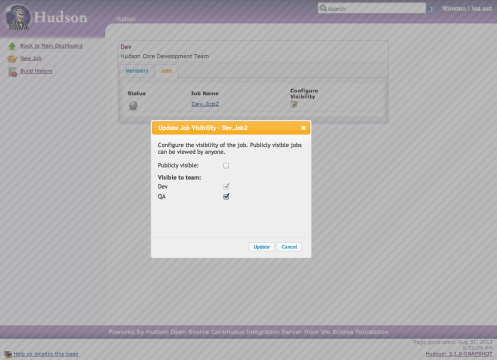
In this case, as Winston, I’ve made Dev.Job2 specifically visible to the QA team. I could also have made it public for all to see. In both cases, the viewer will see the job with the Dev team prefix (unlike a super-user public job which has no prefix) . In either case, the job is visible by the designated group, however, it’s not runnable. If you need a user to be able to run or manage the job then they need to be added to the base team with the correct privileges.
That leads us neatly to the topic of the next article in the series which discusses how we can simplify the management of these teams using user roles inherited from your existing authentication providers.

Spinning up a new Hudson instance for each team has proven very effective. What advantages does this new approach have?
Both are approaches to the problem. When you set up separate infrastructures however, then you of course have to manage each of those separately and allocate resources to each one – rather than have them share a commpon pool of slaves and executors.